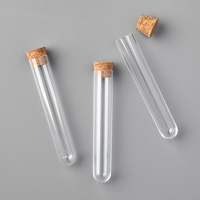
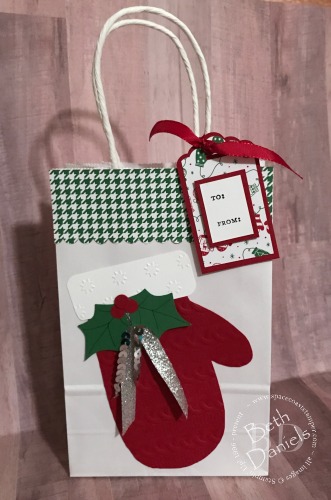
Mitten Christmas Bag

Here’s another Christmas Bag from my Tags, Bags, and Treats Class. I was inspired by a bag given to me last year by my friend Linda. I knew right then it would be in this years class. I drew a pattern for the mitten and the mitten top, cut them out and embossed them. I also drew a pattern for the holly leaves, added some drawn in veins with a marker and added punched berries. Silver ribbon and sequins make it festive and the mitten paper from the Be Merry Designer Series Papers was the perfect piece to make the tag.

Have a great weekend.

Christmas Bag

Every year I hold a Tags, Bags, & Treats class where people come and make a couple of bags, some holiday treats, and Christmas gift tags. This is one of the bags we made.


It is really quit easy to make from just one sheet of Designer Series Paper. For this bag I used the Year of Cheer Specialty DSP.

To make this bag:

  • Score one side at 3-1/2″, 5-3/4″, 9-1/4″ and 11-1/2″
  • Turn the paper 1/4 turn so the 1/2″ scored line is at the bottom.  Score at 2-1/4″
  • Cut out the small 1/2″ piece and cut in indicated lines.
  • From the back side place Tear & Tape where indicated.
  • From the front side place Tear & tape where indicated.
  • Fold sides together.
  • Fold flaps at bottom together.

The banner pieces are 1′ x 6″ and 2″ x 5″

  • Open up the wreath to make it single layer and larger. Attach to bag with glue dots.
  • I used retired red foil paper on this. I so wish Stampin’ Up would bring it back.


Holiday Catalog Year End Sales Event

Stampin’ Up is doing a little inventory cleaning and this is your opportunity to take advantage of special year-end deals on retiring and surplus items. There are many products being offered at discounted prices.

See the list of items here.

Due to high demand for retiring stamps, Stampin’ Up will keep producing retiring stamps until December 21 (accessories are only while supplies last).

The 2017 holiday catalog ends on January 2, but that doesn’t mean you have to say goodbye to everything just yet!

  • We’re carrying over some of the catalog’s most popular items, and giving you the opportunity to love your favorite products a little longer.
  • Items from the 2017 holiday catalog carryover list will remain active and available until May 31, 2018.After this date, items will either appear in the 2018–2019 annual catalog or be retired.
  • NOTE on Bundles: the bundle pricing will go away on January 2. If you’re in love with one of the carryover products that are currently bundled, get them now and save 10%!

See the list of items carrying over here.

CD Calendar November & December 2017

I don’t believe I am up to date with posting my monthly CD Calendar sheets so for tonight I will post November and December and then check to see what I may have missed later. It’s late, I just finished a class and I’m a bit tired and sleepy. (Yawn)

This is so much prettier in person because the branches have Dazzling Diamonds glitter on them and it really sparkles.

The class I had tonight was my annual Tags, Bags, and Treats class so while they were busy with the projects I actually was finishing up my own 2018 CD calendars that I give every year as gifts. 17 of them this year! I’ll be posting those beginning in January. And check back later for photos of some of the bags, tags, and treats pictures.

Thanks for stopping by

Online Extravaganza & Stamparatus Positioning Tool

10% – 50% OFF selected items,

November 20 – 26, 2017

Item List Flyer US


I am super excited about the new Stampin’ Up positioning tool, the Stamparatus. I was part of a group of Stampin’ Up Leaders who  had a small part in the design of this new tool from Stampin’ Up! The Stamparatus allows you perfect placement EVERY time. Input from thousands of demonstrators resulted in a product with all of the very best features and none of the drawbacks of other positioners–with a sleek and sturdy design and some WOW new features.

  • Multi-step stamping? You’ll never waste cardstock trying to line things up again.
  • Multiples of the same card? No problem! Set it up once and stamp as many as you want.
  • Partially-stamp an image? Never fear! You can stamp again in precisely the same spot.

Here are some of the features:

  • Compatible with both red rubber cling-mount and clear photopolymer stamps
  • Built-in rulers and gridlines for quick measuring and placement
  • 2 open sides so you can stamp on larger paper, but not take up tons of space
  • 2 clear grid reversible hinged plates: a total of 4 surfaces to work with without having to change stamps!
  • 2 strong bar magnets to hold the paper in place (less finger-pinching than round magnets)
  • Magnet storage areas built into the bottom of the worksurface–never lose them!
  • Foam mat to use with photopolymer stamps included, for best impressions
  • Easily wipes clean with baby wipes or tissue
  • At $49, compares very favorably to other positioner tools on the market

Watch this short video that covers the basics of what the Stamparatus does, why it has multiple plates, how to use it for regular stamping and making multiples, and storage and cleaning tips. Five Things You Need to Know About the Stamparatus.

Stampin’ Up hates to disappoint anyone with backordered items, so they are offering special “reservation periods” to help space out the shipments, since the manufacturers can only produce so many at one time.

The special preorder reservation periods are as follows:
November 16-30th, 2017 (for delivery around Feb 1st, 2018) SOLD OUT, Sorry!
December 5-30th, 2017 (for delivery approx March 15th, 2018)
January 15-30th, 2018 (for delivery about April 15th, 2018)

This is so popular that the first reservation period sold out in about 25 minutes. So if you want to reserve yours be sure to do it immediately on the selected date.

Customer Stamparatus  Q & A

Q: How do I reserve my Stamparatus?
A: Normally you order Stampin’ Up! products through the online store; in this case, you will click the RESERVE link on the Stamparatus page which will take you to the reservation page. For step-by-step instructions, please see the How to Reserve Your Stamparatus Tutorial for Customers.

Q: What if I do not have a Stampin’ Up! customer account?
A: To reserve a Stamparatus, you must have a customer account. To create one, click Create Account on the online store.

Q: Why does it take so long for the Stamparatus to ship?
A: We will place an order with the manufacturer based on how many reservations are made during any given reservation window. Shipping dates depend on how long it takes the order to arrive in our warehouse after the tools have been manufactured.

Q: Am I billed at the time I reserve my Stamparatus?
A: No. However, a credit card is required to reserve the product.

Q: When will I be charged for the Stamparatus?
A: When inventory arrives in the warehouse, we will add your reservation to a shopping cart. We will then send you an email notifying you that your Stamparatus order is ready. Once you finalize payment and close your order, the system will charge your credit card.

Q: Will I be able to add other products to my Stamparatus reservation?
A: No. However, once your reservation is transferred to your shopping cart, you will then be able to add other items to your order. Important note: Please do not delete the Stamparatus from your order. We will not be able to add it back and you will lose your reservation.

Q: Will I be able to update my address and credit card information when I open my shopping bag to complete my order?
A: Yes.

Q: What if I change my mind and want to cancel my reservation?
A: You can cancel your reservation at any time.

Q: Will the tool be available in the 2018–2019 annual catalog?
A: Yes. Once the annual catalog ordering period begins, you will be able to order the Stamparatus as you would any other product. Reservations will no longer be required, and there will be no limit on the number of tools you can order.

Q: Once the Stamparatus has been added to my shopping cart, how long will it stay there?

A: Indefinitely. As with all products, it will be subject to temporary interruptions in availability depending on demand.

Q: When I close my order, can I take advantage of current Stampin’ Up! promotions? A: Yes.

Q: How did we come up with the name Stamparatus?
A: We landed on an innovative name by combining two words that speak to the end use of the tool as well as Stampin’ Up! branding.

Stamp: To impress a pattern or mark (especially an official one) on a surface, object, or document using an engraved or inked block or die or other instrument

Apparatus: The technical equipment or machinery needed for a particular activity or purpose

Stamp + Apparatus = Stamparatus

This is all a lot to digest so please let me know if you have additional questions.

I am getting ready for Thanksgiving. My family and I are celebrating today instead of Thursday due to them needing to spend time with other family members too. Several years ago we decided since they have multiple places to eat on Thursday and that is just way too much food that we would do a soup and salad bar. It has now become a favorite tradition. My son, my daughter, and I all make a different soup. Then we set up a long table for the salad bar. I’ll try to share pictures later in the week.  My table gifts are from the September Paper Pumpkin and filled with candy and nuts. And my salt and pepper shakers are a special remembrance of my dad who gave them to me many years ago.

We have much to be thankful for. Have a Blessed Thanksgiving.

Tranquil Tulips

One of the great advantages of being the hostess of a workshop or party is that you can then select any of the “hostess only” stamp sets listed in the back of the catalog as part of your FREE Stampin’ Rewards. Today’s card was made using the hostess set Tranquil Tulips and was inspired by a gift box from demonstrator Erica Cerwin.

The tulips are 2-step, meaning you use two different stamps to create the image. The first stamp, the bottom part of the tulip, was stamped with Pumpkin Pie ink. Then the second stamp was stamped over it with Peekaboo Peach ink. I find it is much easier to line the images up if you stamp the darker image first. I fussy cut two of the tulips and popped the larger one up with a Dimensional. The polka dot designer series paper is retired paper I was trying to use up but there is other black and white papers available (check out the Holiday Catalog). The sentiment is from Wood Words. I was sad when our seam binding retired and now we have an even prettier new seam binding in this years catalog. It makes the best bows and mails easily. 

Here is the inside of the card:

I love to use a coordinating mat giving layers to a card however it does use more paper so I just used narrow strips of Peekaboo Peach to give the illusion of the designer series paper and the white cardstock being matted.


Holiday Catalog Live Today

This years Holiday Catalog is packed with great products and lots of fun and creativity. If you don’t have one yet be sure to let me know. I would be happy to get one to you.

Paper Pumpkin – 50% off – only 10 more days to take advantage.

Don’t forget the Paper Pumpkin 50% off special on the first kit for new subscribers. You have until September 10th to take advantage of this offer. It’s the best time to give it a try. You can cancel it at any time. Just use the code HALFOFF0917 when you sign up.

Hostess Code: 6QAFF3YY for online orders that are less than $150. 


I hope you had a great day. Mine was good up until the dentist told me I needed to have a crown! 

Have a great weekend and a happy and safe Labor Day


Paper Pumpkin 50% Off!

If you have never tried Paper Pumpkin before then here's a deal for you! Until September 10th new subscribers can get their first kit half off. That's certainly worth giving this a try and you can cancel it at any time.

Here's the details. Each month, your kit includes a stamp set and one or two stamp spots. Stamp Spots are small ink pads in official Stampin' Up colors. These alone are worth the money! And it's a way to build up your ink colors. I love the small ink spots because they are small and easy to take with you when you plan on stamping away from home. Your kit will also contain everything you need to make that month's projects except some glue or adhesive. The best part is that with each kit you get stamps which you can use over and over. Your first kit also comes with an acrylic block. After the first kit at 50% off you will receive each upcoming month's kit for $19.95 plus tax (shipping is free).

Here are the kits from the last few months:

Some kits may make 8 cards while other kits like the one above had a combination of cards and gift bags. Because this subscription comes to you as a surprise, and who doesn't love a surprise, you may not like the product one month (highly unlikely) so when that happens you just check out the Paper Pumpkin Pinterest posts where you will find so many alternate ideas using the products in that month's kit. I like to go there even when I am loving the designs in the kit just to see what others have done with it.

How do you sign up? There is a link on the lft side of the blog or you can go to PaperPumpkin.com to sign up. There will be a place to enter my name as your demonstrator. Remember that you must subscribe by the end of the day September 10th to get this special and use the code HALFOFF0917.


Fall Pull Up Card

With temperatures soaring up into the 90's it's a bit hard to think about Fall and Christmas but having the new Holiday Catalog makes it easier. If you don't have the new catalog and want one be sure to let me know. You will just have to wait to order from it until September 1st.

For this card I combined Colorful Seasons stamp set and coordinating framelits from the annual catalog with sentiments from Painted Harvest stamp set and the Painted Autumn Designer Series Paper from the Holiday Catalog. I got the directions for this pull up card from demonstrator Lyssa Zwolenek. You can see her card and directions here.

When you open the card the inside piece of vanilla card stock pulls upwards.

The card base is retired Kraft 12×12 paper. I should have double checked the catalog before making the card because I thought it was still available. sad However, we do have Vanilla 12×12 paper which is the size you need to make this card and I believe the card would be just as pretty on a vanilla card stock base.